In this article, it is discussed how to online file Form 10A on the new e-filing income-tax portal. As per Rule 17A(3)/(4), Form 10A is required to be online filed and shall be electronically verified by Electronic Verification Code (EVC) or by a Digital Signature (DSC). In this article, it is discussed how to electronically verify application in Form 10A with Digital Signature Certificate (DSC).
As per Rules 17A(3) and (4) of the Income-tax Rules, 1962, Form No. 10A is required to be furnished online electronically.
Form No. 10A shall be verified by the person who is authorised to verify the return of income under section 140 of the Act with digital signature (DSC) or EVC.
If the return of income of the applicant is required to be furnished under digital signature, then furnishing Form 10A with DSC is compulsory else the forms can be furnished with EVC.
How to e-Verify Form 10A with DSC
Before verifying Form 10A with a DSC, it should be noted that the procedure to sign Form 10A with a DSC has been changed in the new e-filing portal compared to the digitally signing process in the old e-filing portal.
In the new e-filing portal, the DSC is required to be registered in the e-filing account of the individual who is signing Form 10A. For example, if the Trust or NGO is formed as a Society then the Secretary or the President of the Trust/NGO has to sign Form 10A. In this case, the DSC is required to be registered in the e-filing account of the Secretary or the President and not in the e-filing account of the Trust or NGO. In the old e-filing portal, the DSC was required to be registered in the e-filing account of the Trust.
Once the DSC is registered in the e-filing account of the Individual, then the same is not required to be registered in the e-filing account of the Trust or NGO. In such a case, if the same individual is also a signing authority in other NGOs or companies or in any other organization, no separate registration of the DSC is required in the e-filing account of such other organizations. The registration of DSC in the individual’s account is sufficient.
In the old e-filing portal, registration of DSC is required in each of the organizations e-filing account separately.
Suppose Mr Rakesh is President of XYZ Foundation, an NGO. He is also a director in a Company XYZ Private Limited. He is a signatory in both organizations.
In the new e-filing portal, the DSC of Mr Rakesh is required to be registered on the e-filing account of Mr Rakesh. No registration of DSC in the e-filing account of the NGO or the company is required.
The NGO or the Company is only required to verify the Form/Returns with the DSC of Mr. Rakesh only.
How to register DSC on the e-filing account
As per the procedure, the DSC is required to be registered in the e-filing account of the individual who will be singing the return/form of any organization.
For registering DSC on the e-filing account, one needs to download the DSC utility (emBridge) from the portal using this link. It is available on the portal under the menu titled ‘Download’ > ‘DSC Management Utility’.
After downloading the ‘emBridge’ utility, which is in the zip file format, one has to extract the set-up file. Double click on the set-up file to install the ‘emBridge’ utility.
Once the utility is installed successfully, one can use the DSC on the e-filing portal to register and sign any document.
Icon of emsigner on the Desktop
The ‘emsigner’ while running on the Computer system. Click on ‘Hide’ to hide the software. It will run in the background.
Step by Step guide to Register the DSC
The procedure to register the DSC on the new e-filing portal of an Individual is detailed below-
1. Log in to the e-filing account of the Individual with his/her User ID (PAN) and Password.
Click on the ‘Continue’ button to log-in into the e-filing account of the Individual.
2. Click on the Profile Picture or Select ‘My Profile’ from the top-right menu of the portal where the name of the Individual is dispalyed.
3. On the left menu panel under the profile image, click on the ‘Register DSC’.
4. Tick the Check-box ‘I have downloaded and installed emsigner utility.’ and then Click on ‘Continue’.
5. On the next page, select the Provider, ‘Certificate’ and fill in the ‘Provider Password’ of the DSC.
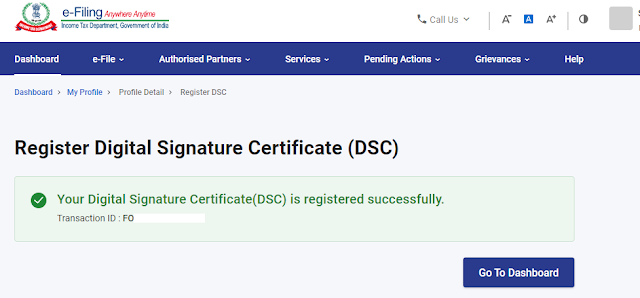
7. Click on ‘Sign’ to complete the DSC Registration. The successful message will appear on the screen.
Note: 1. One can download the emsigner utility installation guide from the link given at the end of the form on the portal.
2. Insert the DSC token in the USB port before registering the DSC.
3. You can have multiple ‘emsigner’ of various agencies like emsigner for ITR, for TDSCPC, GST, MCA on the same computer.
Step by Step guide for Using the DSC to sign a document
Once the DSC is registered on the e-fling account of the individual, the DSC can be used for signing the return of income (ITR) or any other form of the organization. In this case, the signing process of Form No. 10A is discussed. In the case of other forms or returns, the signing process will be the same.
Prerequisite:
Run the ‘emsigner’ from the Desktop shortcut, if it is not running. If ‘Update’ is shown on the ‘emsigner’ utility then click on the ‘update’ else click on ‘Refresh’ once.
In the application in Form 10A, click on ‘Proceed to E-Verify’. Read this article to know how to reach this juncture. The process of affixing DSC or digital signature on any ITR or form on the new e-filing portal is discussed below-
1. Insert the DSC of the signing authority in the USB port of the Computer.
2. Click on ‘Proceed to E-Verify’ of the form. Here an example is shown from Form 10A.
3. Use the option ‘I would like to verify using Digital Signature Certificate (DSC)’.
4. Once the option is ticked, the button ‘Continue’ will get activated at the bottom right corner of the form. Click on the button ‘Continue’.
5. A confirmation message will pop up with the message “Are you sure you want to Proceed to e-Verify?”. Click on ‘Yes’ to continue.
6. On the next page, you will be asked to confirm whether the ‘emsigner’ utility is downloaded and installed.
7. Tick in the message ‘I have downloaded and installed emsigner utility’. This will activate the ‘Continue’ button.
8. Click on the ‘Continue’ button.
9. On the next page, one needs to select the relevant signature and password and then click on ‘Sign’.
A confirmation message will pop up. Click on ‘Yes’ to file the relevant Form.
On successful submission, a message of filing of the relevant form will come and one can download the acknowledgement by clicking on ‘Download’. An example of the successful filing of Form 10A is shown here.
Also Read:
How to File Form 10A on New E-Filing Portal
How to file Statement of Donation in Form No. 10BD
How to issue Certificate of Donation in Form 10BE
How to File Form 10A for Approval under Section 80G
Section 12AB and Form 10A: Procedure of Registration of a Trust and NGO


0 Comments